
Long-Term Care 2.0 Service Integration Platform
A long-term care service integration platform designed to improve Taiwan’s long-term care environment. The concept of this project is to bring long-term care services into the home, reducing the burden on family members. By designing convenient APP calling methods for elderly users to operate the system independently.
Patent Publication Number: M556380 Received 2018 U-start Innovation and Entrepreneurship Program First Phase Subsidy NT$500,000 Won 2018 Asia University Cup 7th Campus Entrepreneurship Competition Second Place
This project aims to improve Taiwan’s government long-term care plan. However, the ten-year long-term care plan faces various difficult-to-overcome problems (such as: complicated and time-consuming application processes, too many service restrictions, severe shortage of caregivers, etc.), making long-term care service promotion extremely challenging. Therefore, we designed a long-term care integration system that modern people can use more conveniently and accept more easily.
Below is the main architecture of our designed system.
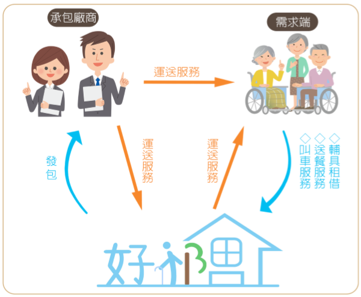
As shown in the figure below, our team provides information integration services, enabling the demand side (care recipients) to enjoy convenient long-term care services, and allowing family members to work outside with peace of mind.
Before building this APP, I first listed the required technologies, then conceived methods to implement related functions, as shown in the table below.
| Required Technologies | Implementation Methods |
|---|---|
| Record care recipient’s personal data and purchased services | Use cloud MySQL server for storage, reducing server load |
| Care recipient transmits voice messages | Use remote access to FTP server for data transmission |
| User login authentication via APP | Use JDBC (Java Database Connectivity) for SQL server authentication |
| Care recipient connects to FTP server via APP | Use FTPClient (Java file transfer) for user upload/download functions |
After completing each implementation method listed in the table above, the various program parts were integrated. However, the process wasn’t as smooth as imagined. I encountered many bottlenecks (such as: syntax errors, incompatible commands, difficult database and FTP server setup, etc.). This made development more challenging - these are the challenges encountered in project design. I searched for solutions online, and after overcoming numerous obstacles, finally implemented this APP.
Relying on other team members’ expertise in long-term care services and my developed APP, we successfully applied for a long-term care service platform utility model patent, and ultimately received U-start innovation and entrepreneurship program subsidy.
Project Architecture
Hardware Architecture:
Cloud SQL Server (freesqldatabase.com):
Remote FTP Server (FileZilla):

AndroidStudio Development Software:
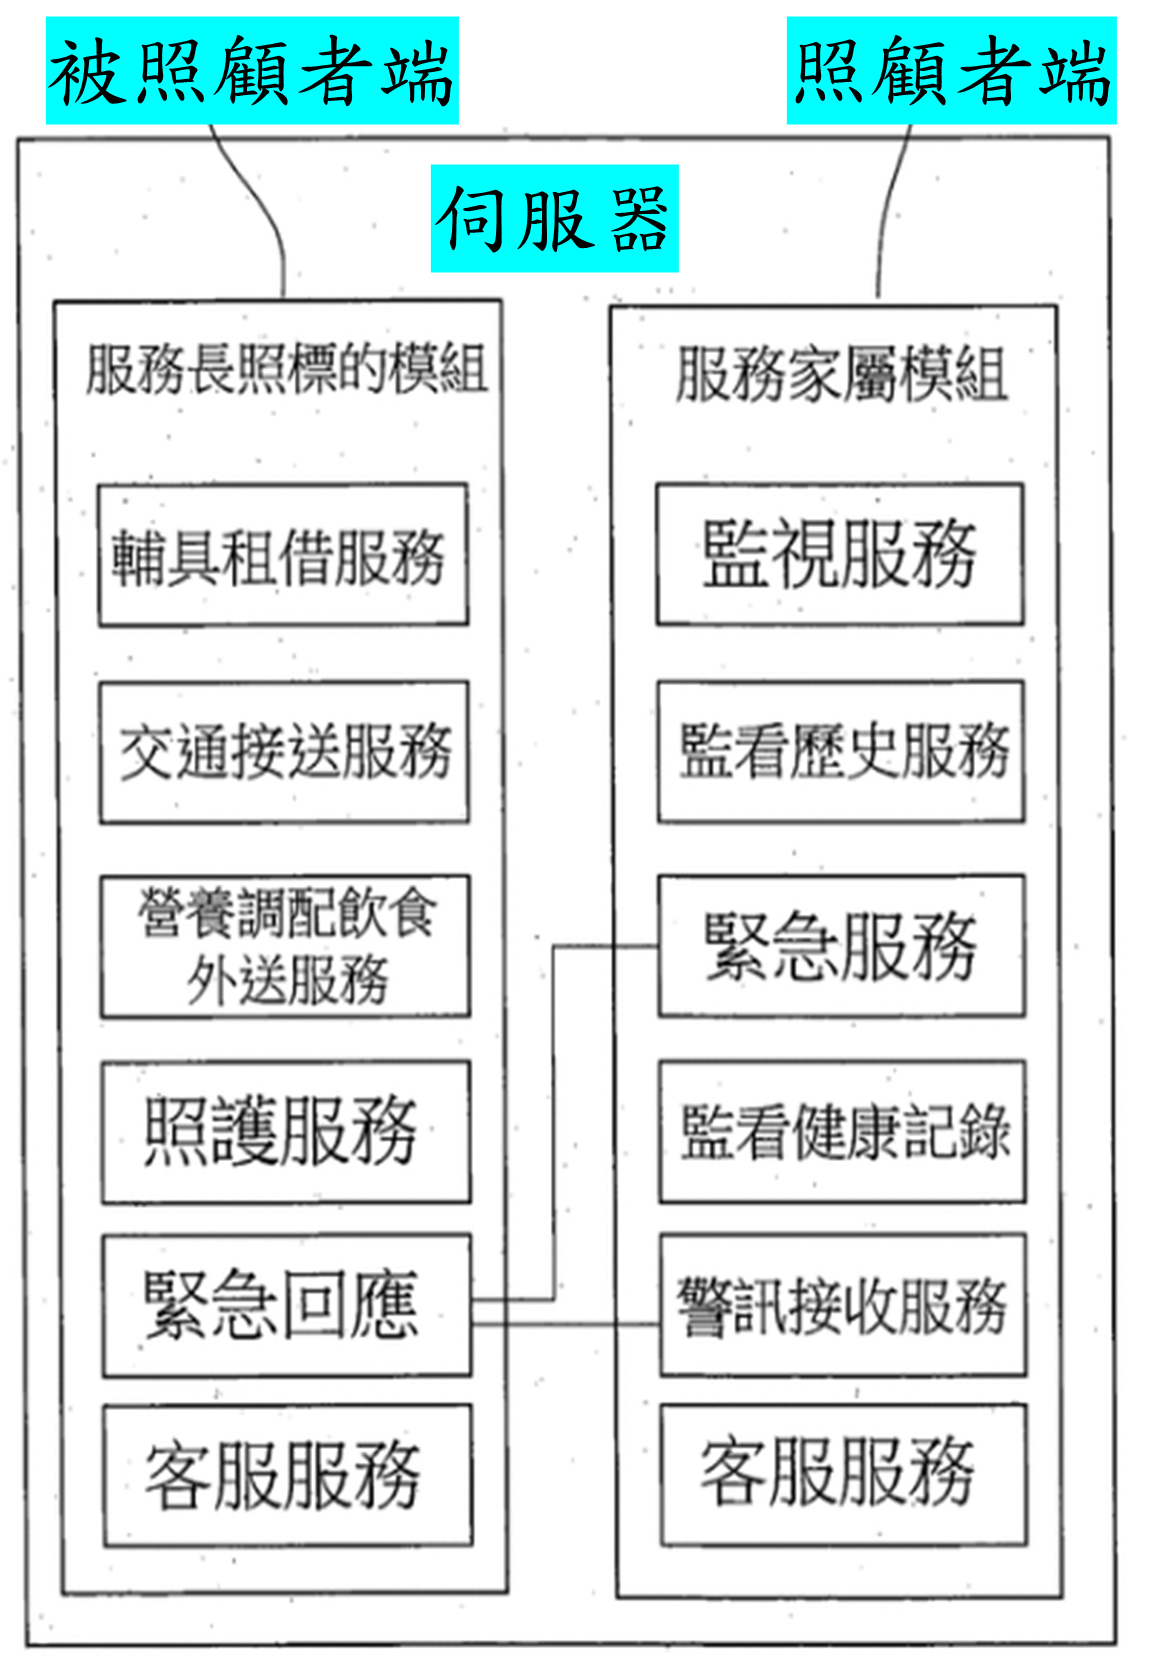
Main Architecture Divided into Three Parts:
Care Recipient Side: Equipment rental, transportation, meal delivery, care services, emergency response, customer service, etc.
Caregiver Side: Monitoring, viewing history, emergency services, health record monitoring, alert reception, customer service, etc.
Server Side: Handles data transmission between caregiver and care recipient, executes various services, records user personal data, medical records, etc.
Project Flowchart
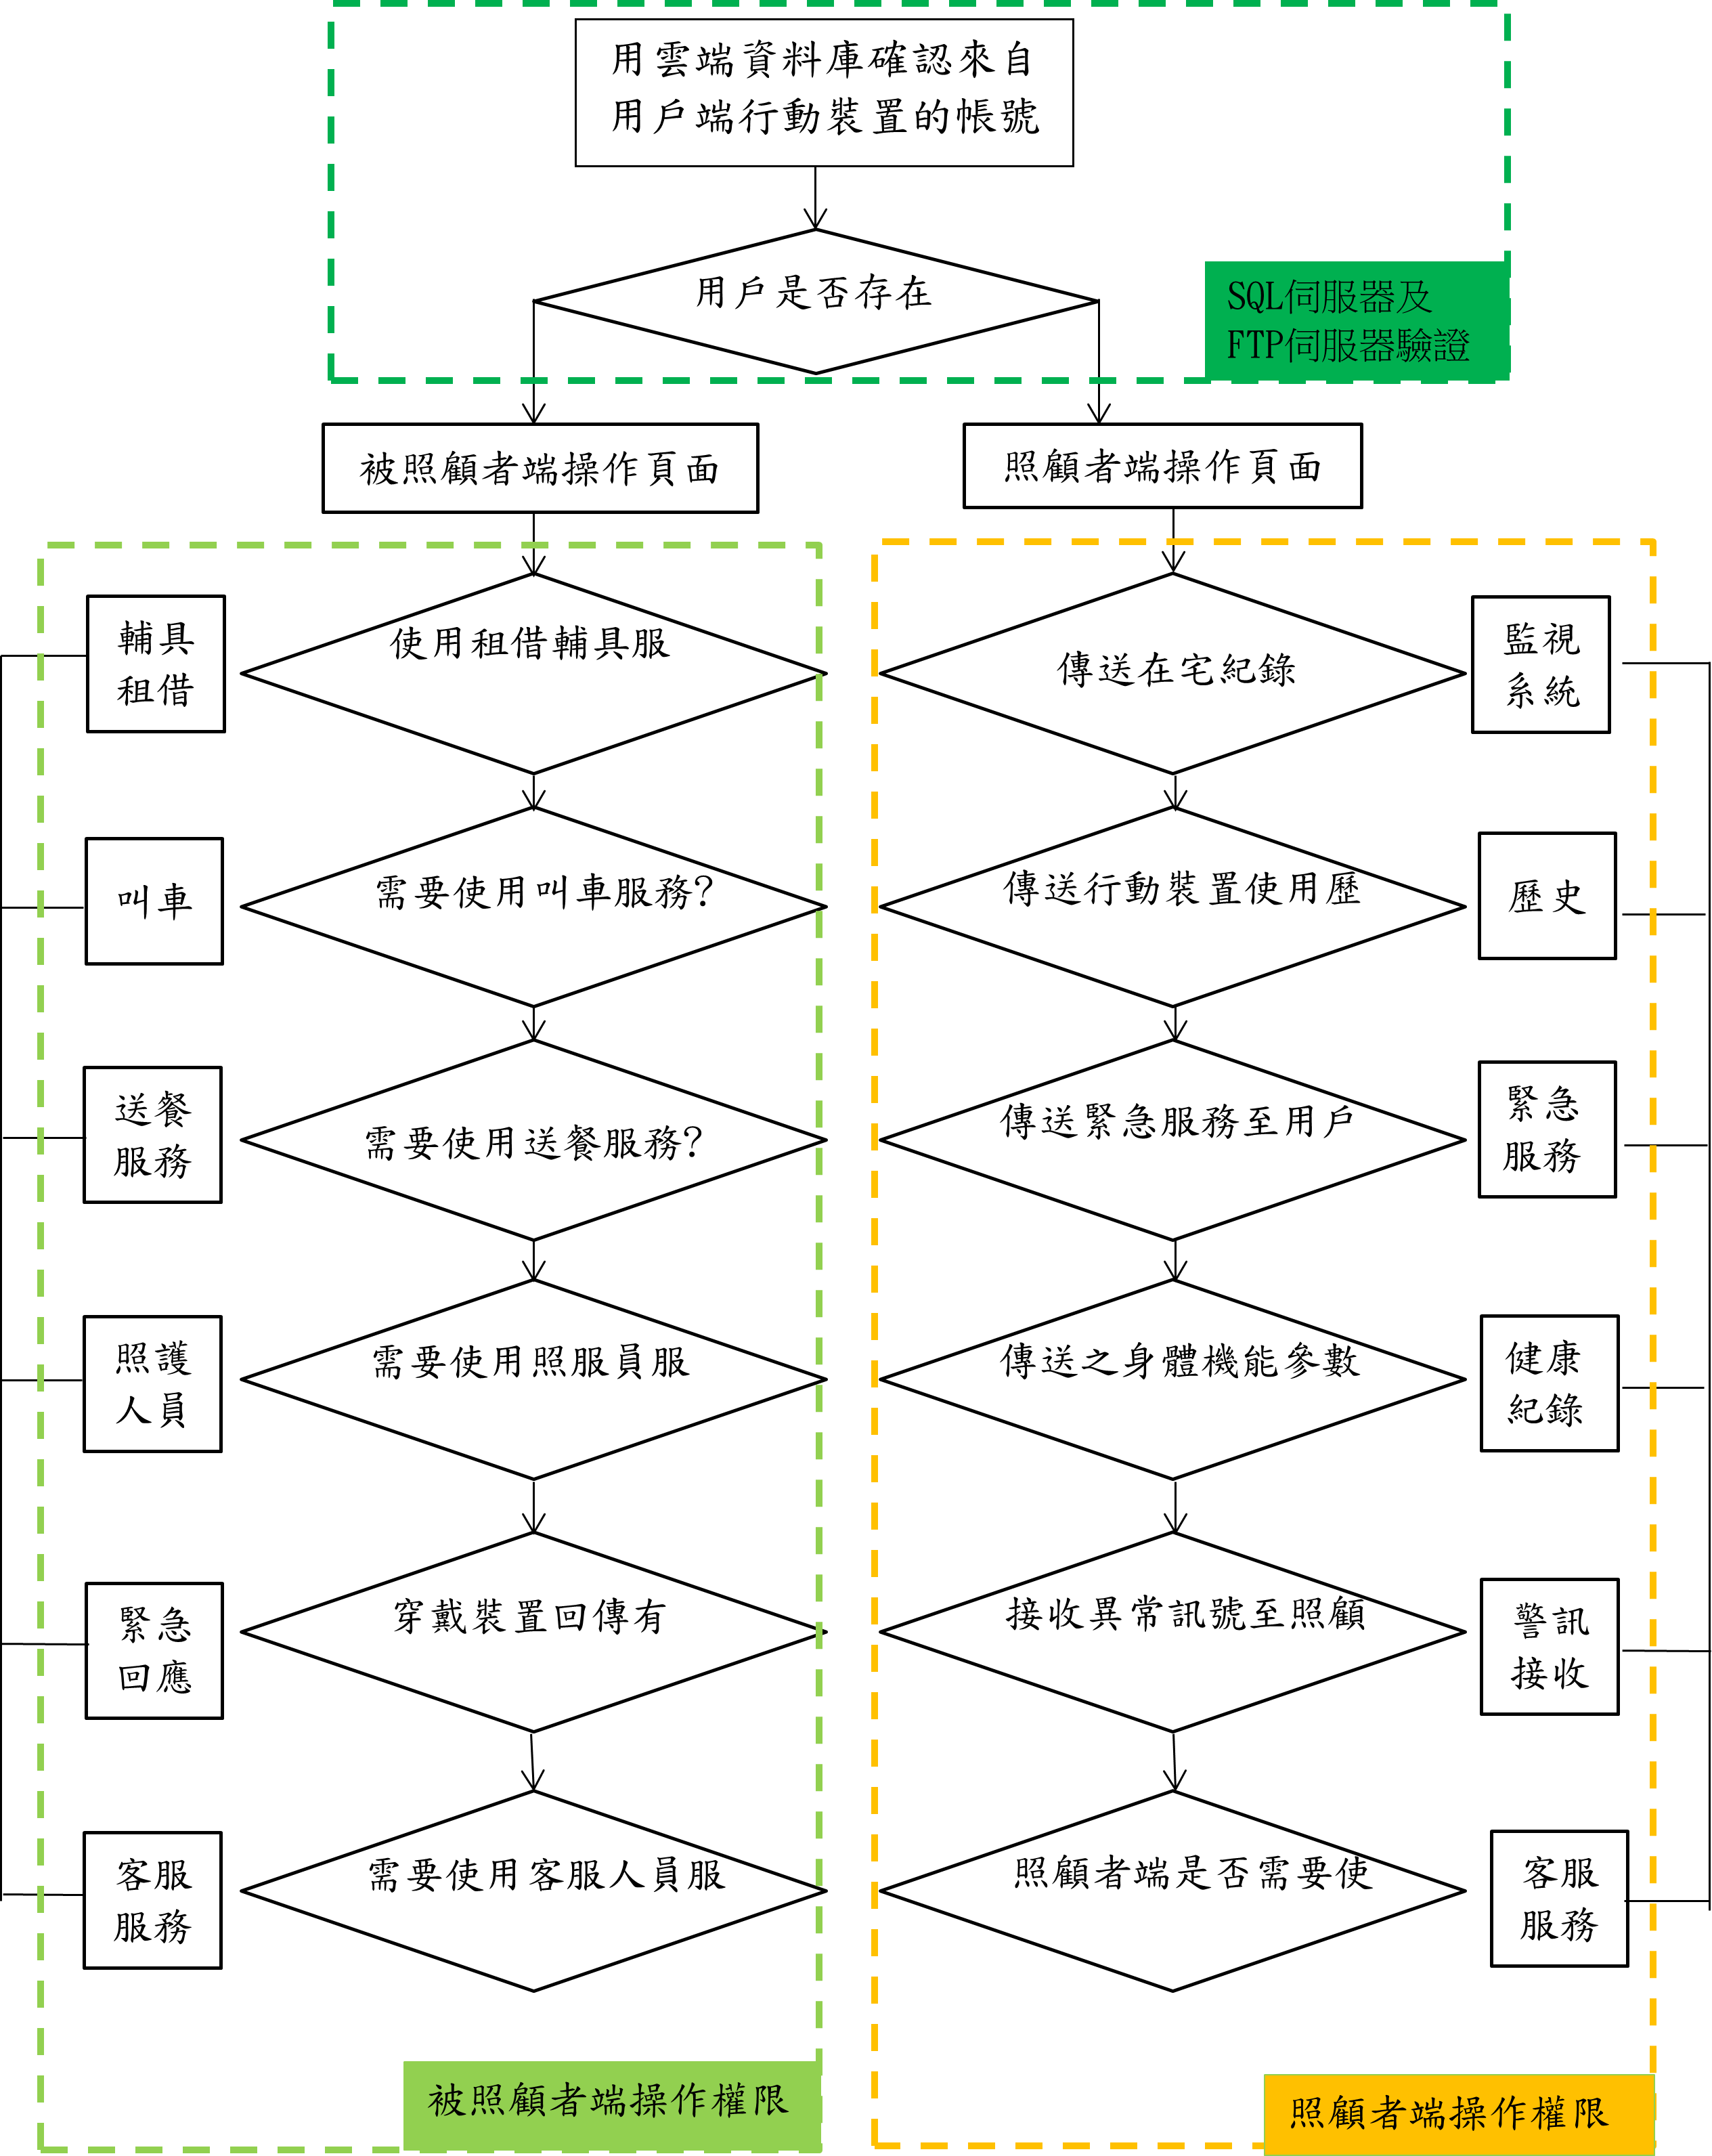
Implementation Process:
Setting Up Cloud SQL Database
Before setting up the cloud database, one must understand SQL concepts.
SQL databases can store large amounts of meaningful data. Data can be added, deleted, and modified. The SQL language has four major categories: Data Query Language (DQL), Data Definition Language (DDL), Data Manipulation Language (DML), and Data Control Language (DCL).
Initially, I built the SQL using WAMP (Windows+Apache+MySQL+PHP) method, setting up the SQL server on the local computer. However, due to local network inconvenience, I wanted to use cloud servers for access. Today’s cloud database technology is mature. Current mainstream servers include:
Amazon Web Services (AWS):

Google Cloud Platform (GCP):
Microsoft Azure:

The above cloud databases are very powerful with complete functionality, thus requiring payment. I ultimately chose the free cloud server freesqldatabase.com. While its functionality may differ from major servers, being free with MySQL database system makes it suitable for academic purposes.
Setting Up MySQL Server
After successfully setting up the SQL server:
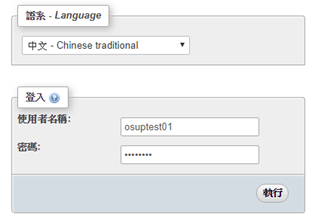
Login to cloud SQL server host
Execute SQL queries on the MySQL Server:
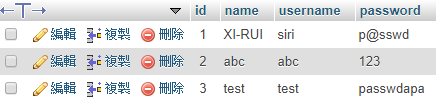
Create database:

Set table content:
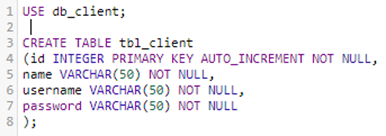
Add test data:
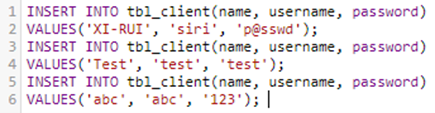
Execution result
Using Java Database Connectivity (JDBC) to Access Cloud SQL Database
JDBC (Java DataBase Connectivity) is Java’s solution for executing SQL. When applications need database connections, they call this API set.
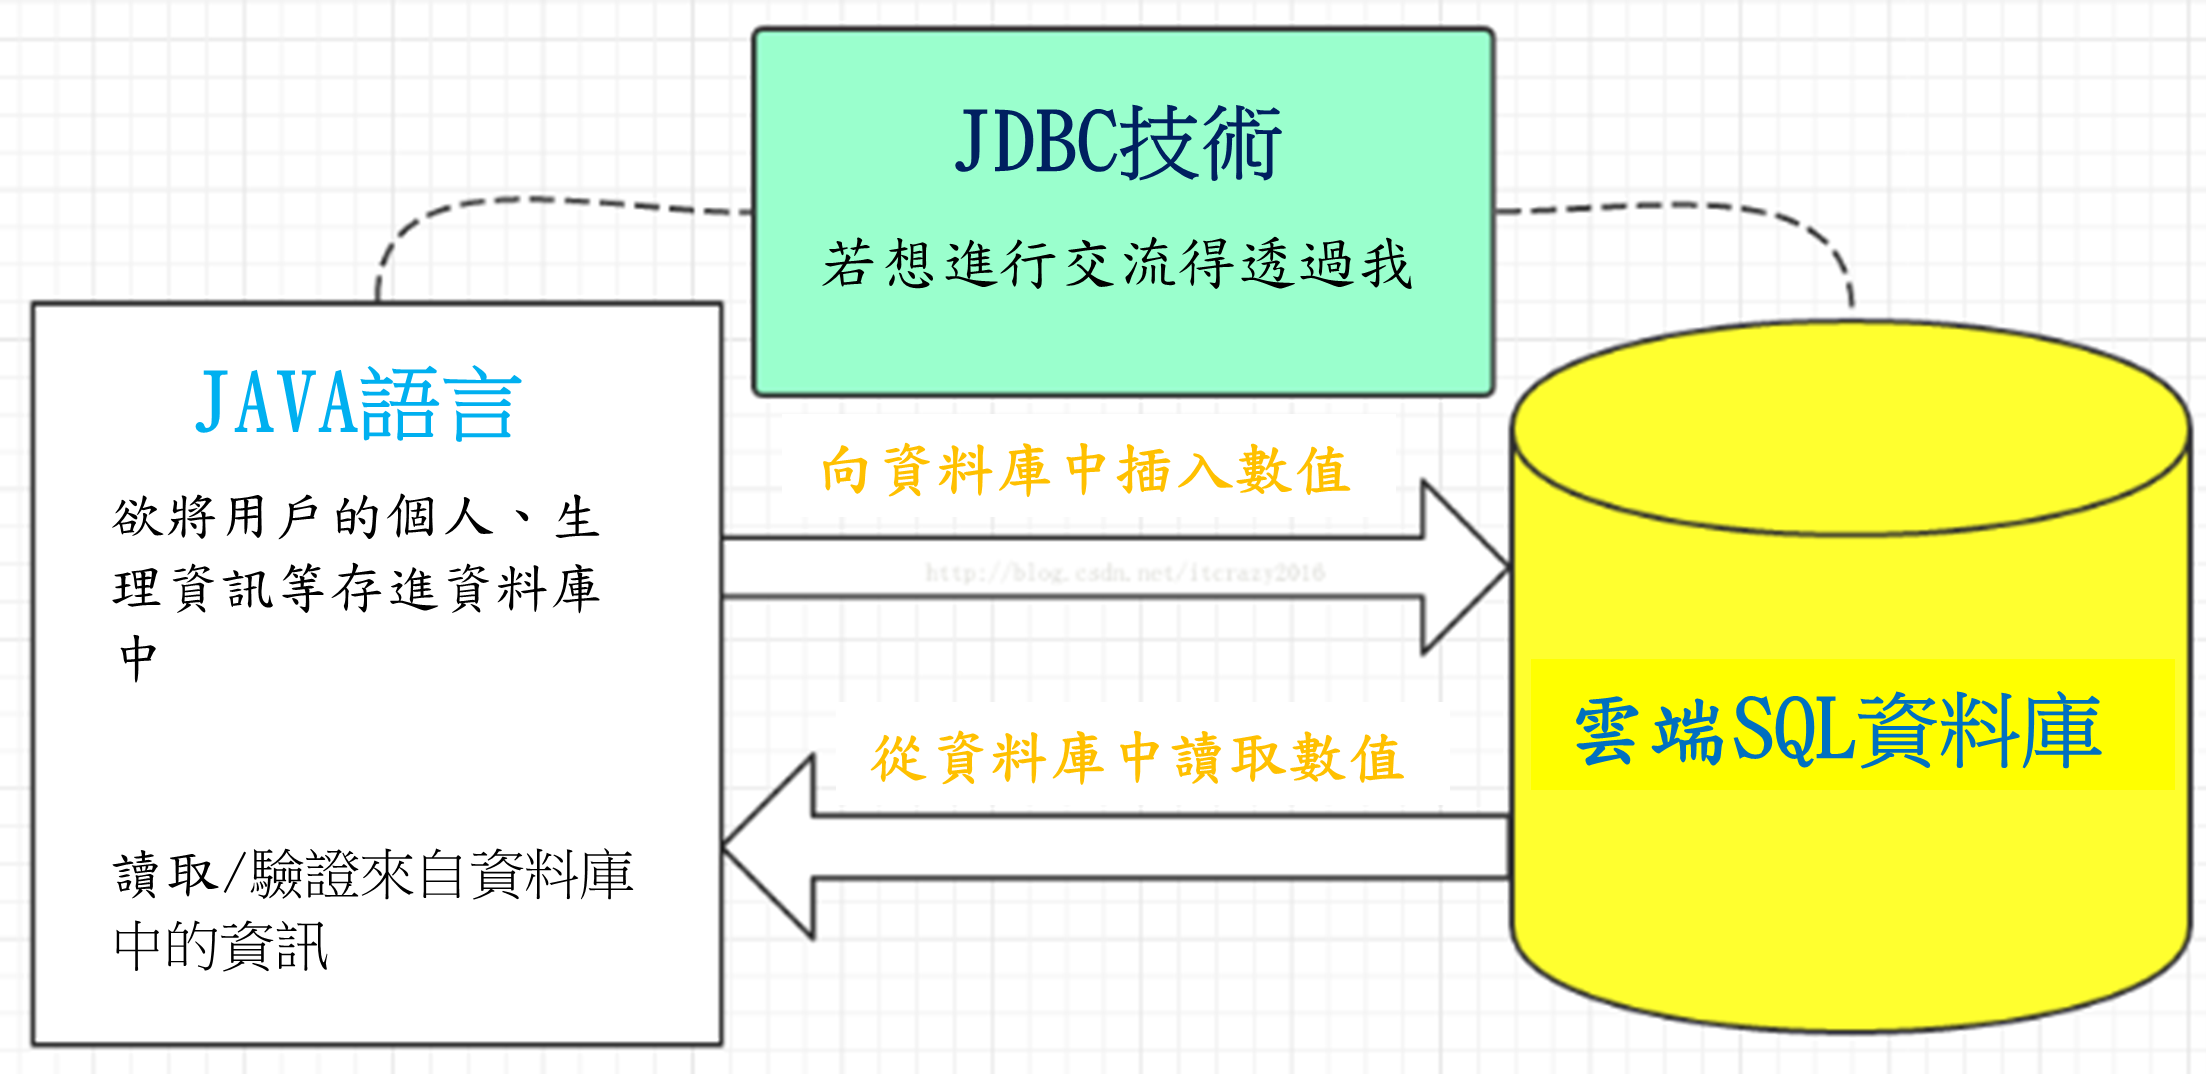
Installing JDBC MySQL Driver in AndroidStudio
JDBC provides a unified interface for Java programs to access various SQL types. Users don’t need to write different code for different databases, but using JDBC requires downloading the corresponding driver.
Since I used phpMyAdmin to build MySQL database, I needed to download MySQL driver: [mysql-connector-java-5.1.43-bin.jar]
After adding JDBC driver to AndroidStudio, due to system compatibility differences, a few lines of code must be added to all module build.gradle to ensure smooth program execution:
tasks.withType(JavaCompile) { sourceCompatibility = “1.7” targetCompatibility = “1.7” }
compileOptions { sourceCompatibility JavaVersion.VERSION_1_8 targetCompatibility JavaVersion.VERSION_1_8 }
Using JDBC Commands in AndroidStudio for Login Verification
Set SQL server connection authentication:
db = "jdbc:mysql://sql12.freesqldatabase.com/sql12252800";
un = "sql12252800";
pass = "84ViEd8Kig";
Use try-catch command for account verification:
If SQL server login succeeds, use SQL command to verify if user is listed:
String query = "select * from tbl_client where username= '" + usernm + "' and password = '"+ passwd +"'  ";
Statement stmt = con.createStatement();
ResultSet rs = stmt.executeQuery(query);
if(rs.next())
{
    z = "Login successful";
    isSuccess = true;
...
Besides verification methods, other additional functions must be completed, such as login failure actions, error and exception information displays, etc.
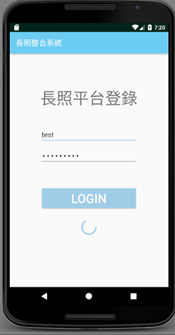
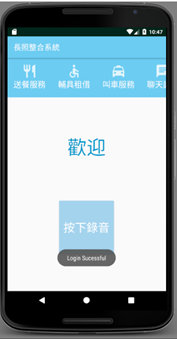
System logging in:
Login successful screen:
Using APP to Send Files to FTP Host
Setting Up FTP Host
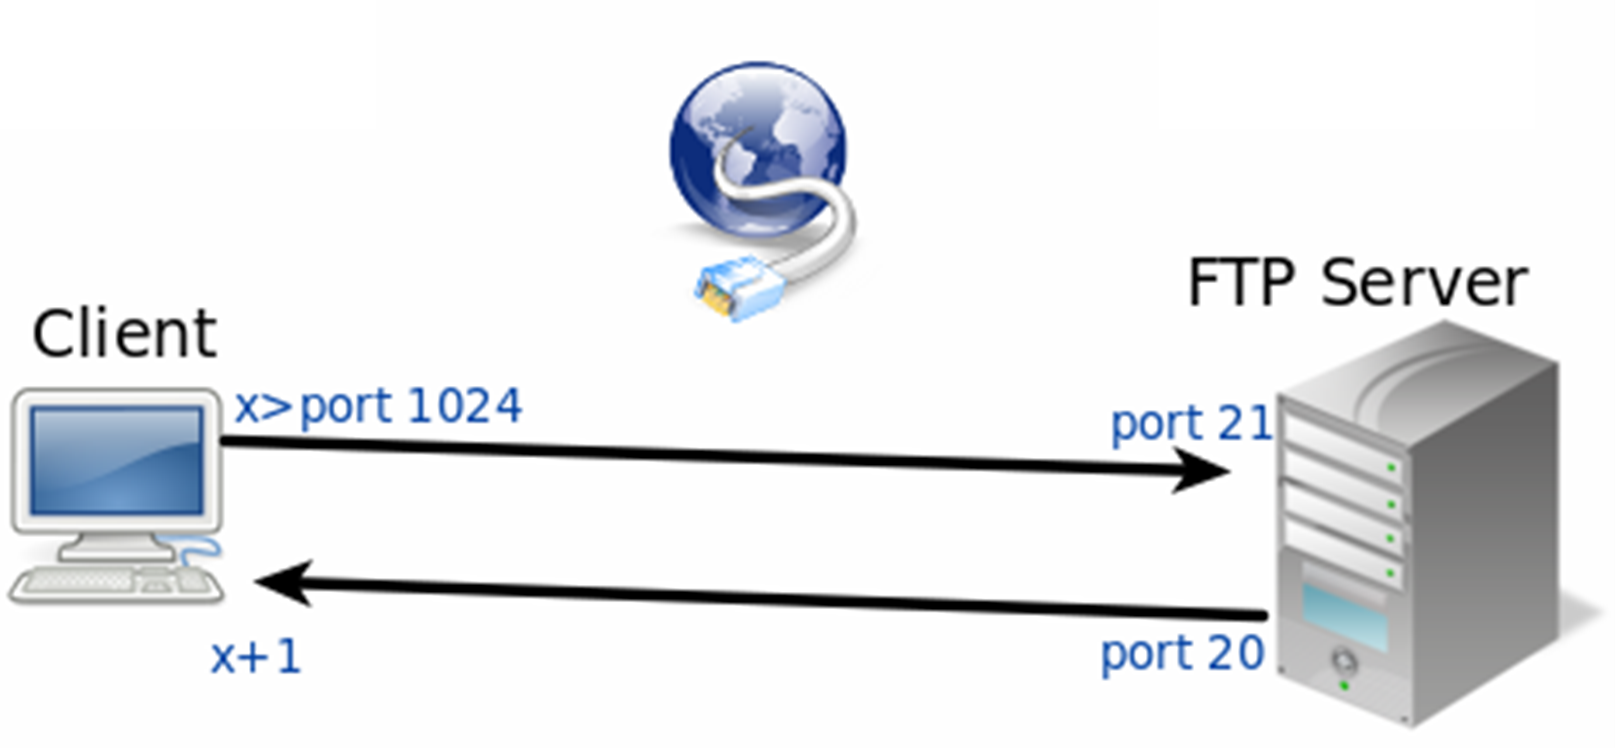
Before handling file transmission to server, you must have a server that can connect to external networks. This can be easily achieved using router port forwarding functionality.
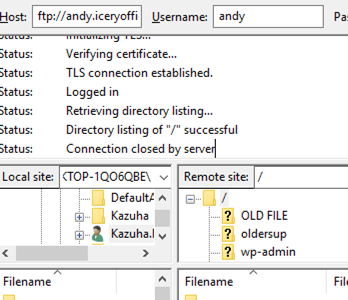
Confirm connection with FTP host:
Using Apache Commons FTPClient API for Data Transmission to FTP Host
Apache Commons Net implements clients for many basic Internet protocols. I used FTPClient commands from one of its classes for file transmission implementation.
FTPClient API enables APP to easily complete file transmission operations
Using FTPClient Commands in AndroidStudio for Data Upload
Installing apache commons net 3.3 driver and environment parameters.
Setting FTPClient command to login to FTP server
new Thread(new Runnable() {
    public void run() {
        boolean status = false;
        status = ftpclient.ftpConnect("andy.iceryofficial.com", "andy", "*****", 21);
        if (status == true) {
            Log.d(TAG, "Connection successful");
......
Designing button actions: record while pressed, upload when released:
Using MediaRecorder for recording implementation
String currenttime = new SimpleDateFormat("MMddHHmm").format(new Date());
mFileNamepath = Environment.getExternalStorageDirectory().getAbsolutePath() + "/OlderSupport/";
mFileName =  currenttime+ mFileStatue + ".mp3";
mRecorder.setOutputFile(mFileNamepath+mFileName);
mRecorder.setAudioEncoder(MediaRecorder.AudioEncoder.AMR_NB);
  try {
    mRecorder.prepare();
} catch (IOException e) {
    Log.e(LOG_TAG, "prepare() failed");
}
mRecorder.start();
......
Using ftpUpload method for upload action implementation
pd = ProgressDialog.show(MainMenu.this, "", "Uploading...",true, false);
new Thread(new Runnable() {
    public void run() {
        boolean status = false;
        status = ftpclient.ftpUpload(
                mFileNamepath+mFileName,
                mFileName, "/oldersup", cntx);
        if (status == true) {
            Log.d(TAG, "Upload successful!");
......
Results
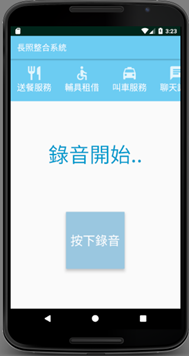
Recording screen:
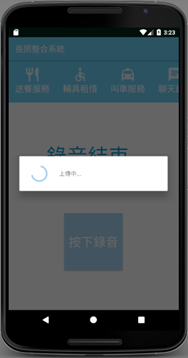
Upload screen:
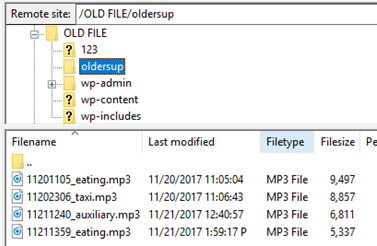
Upload to FTP server result:
Reflection
This project took me about four months from conception to completion. It would be a lie to say it wasn’t hard. Initially, just planning the user UI architecture took several weeks of discussion with team members. When actually writing code, due to insufficient mobile app development experience, I encountered many unexpected problems (API compatibility issues, SDK version issues, permission issues, and various troublesome problems). After overcoming numerous obstacles, I gained tremendous satisfaction. Looking back, I learned many invaluable experiences through this process.